HOWTO Paint Terrain Design Doc in GIMP
2022-02-13T20:06:00Z Updated.
Ever wanted to sketch a terrain design in GIMP wishing you could transfer it to Giants Editor (GE) by click of a button? This tutorial teaches you how to do that.
The RGB colors used in this tutorial are still work in progress, they match Farming Simulator 19 (FS19) PDA map meaning ESC mapview image colors pretty closely, but some parts like forest is not even used in mapUS image so we use whatever color felt like best fit. Most likely we change these RGB colors when we refine the tool pipeline.
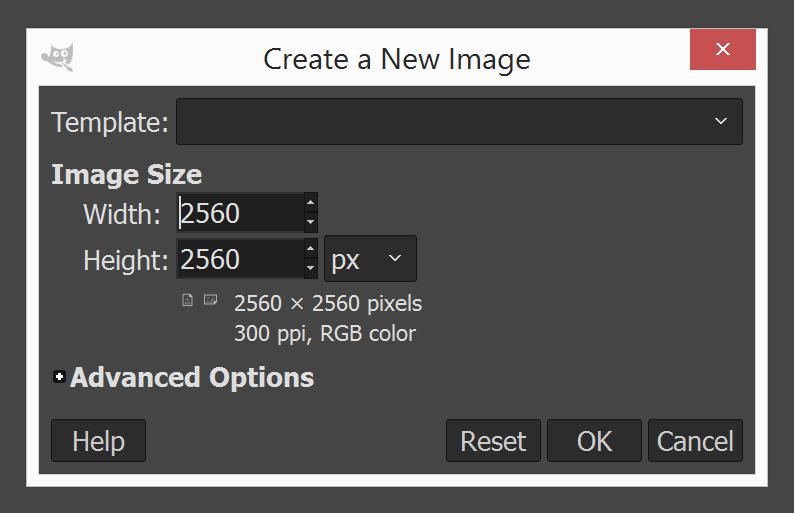
In GIMP create new image (CTRL-N), it should be one pixel per meter scale, so if your terrain is 2.5km x 2.5km the image should be 2560 x 2560 pixel resolution. If interested see GIMP Terrain Design Document Image Resolution page for details.
Paint background grass RGB 104,107,79 color using foreground fill tool CTRL-, (control and comma keys together).

Save image with CTRL-S into GIMP XCF format. Choose proper descriptive file name to it (no special characters, etc).
Create new layer by pressing CTRL-SHIFT-N, give it name "Railroad Tracks".
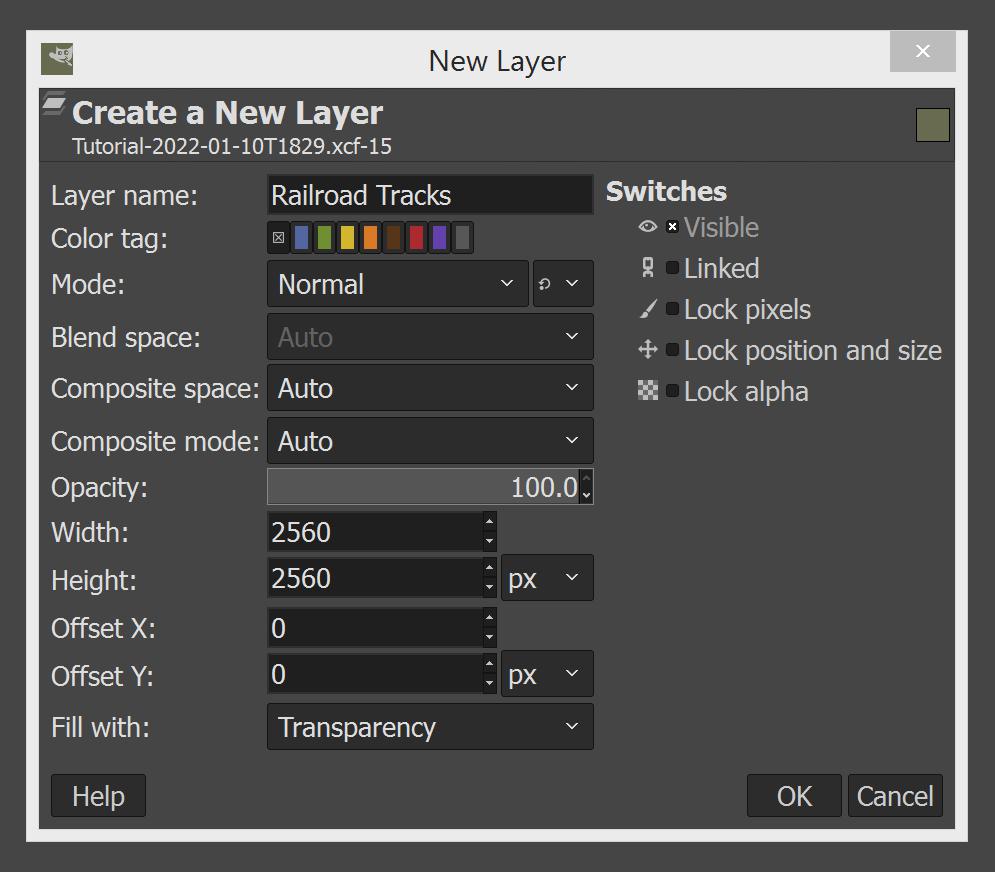
Click OK or press enter to create the new layer.
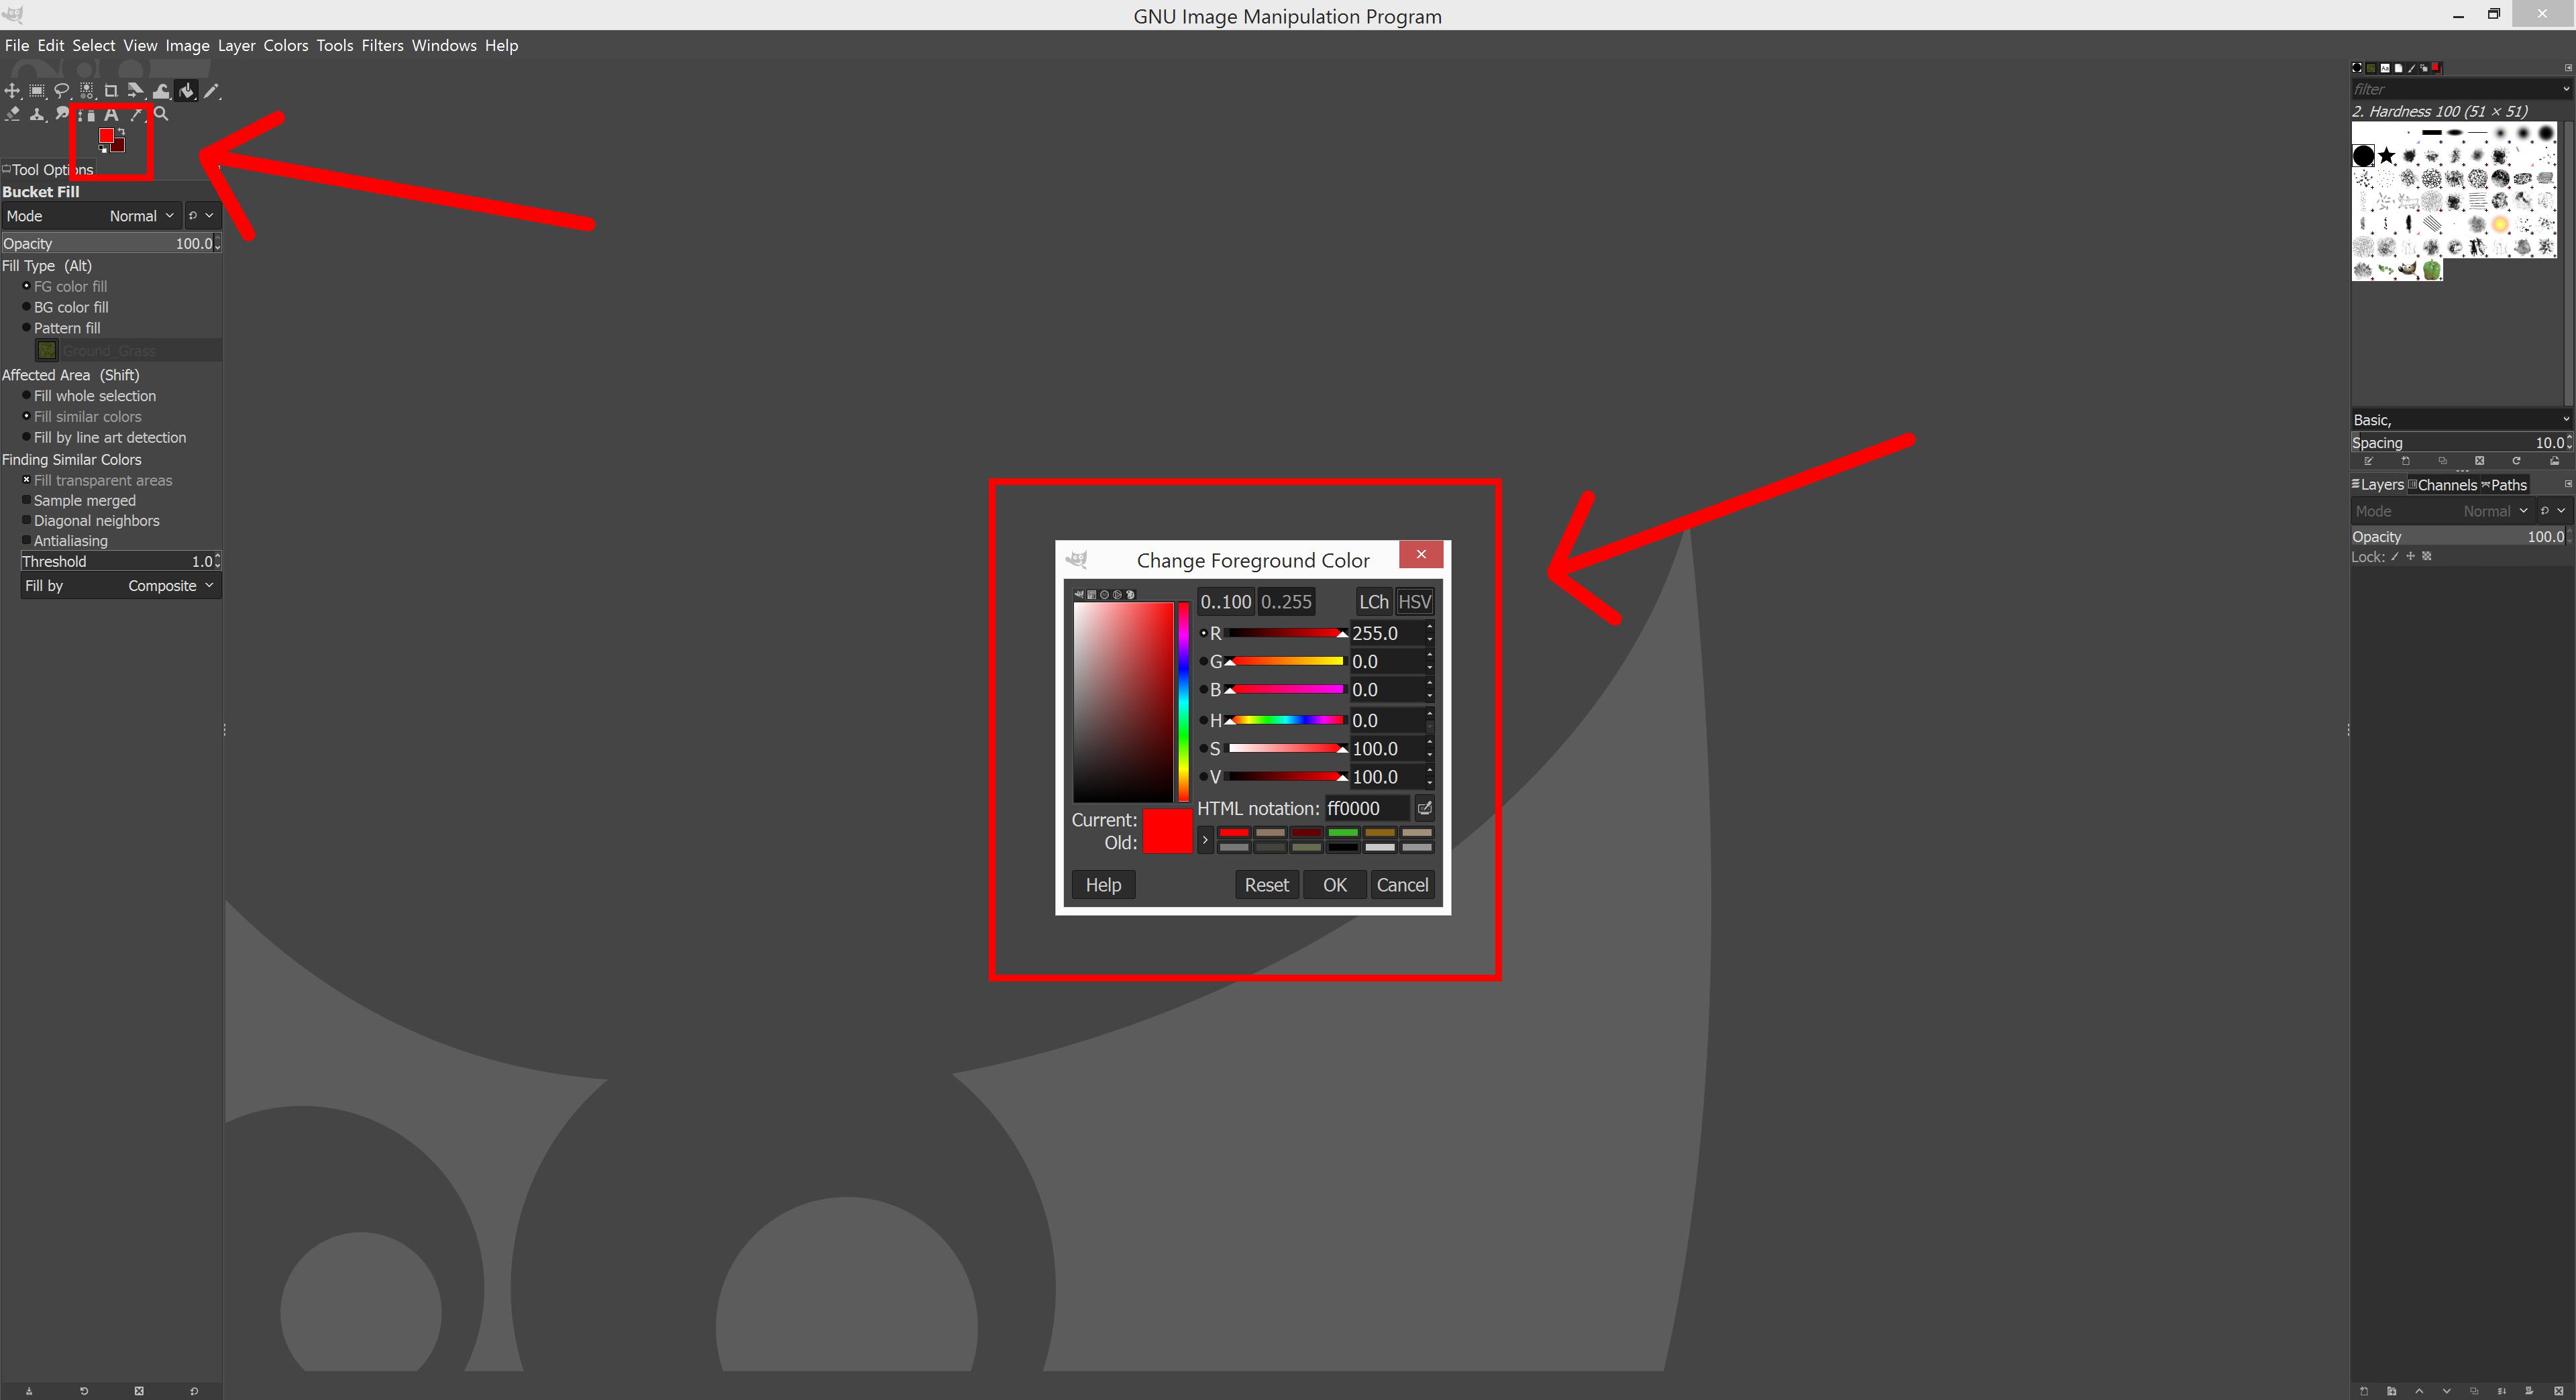
Open "Change Foreground Color" dialog by clicking the button in GIMP top left corner area, kind of like two squares overlapping. See below screenshot:
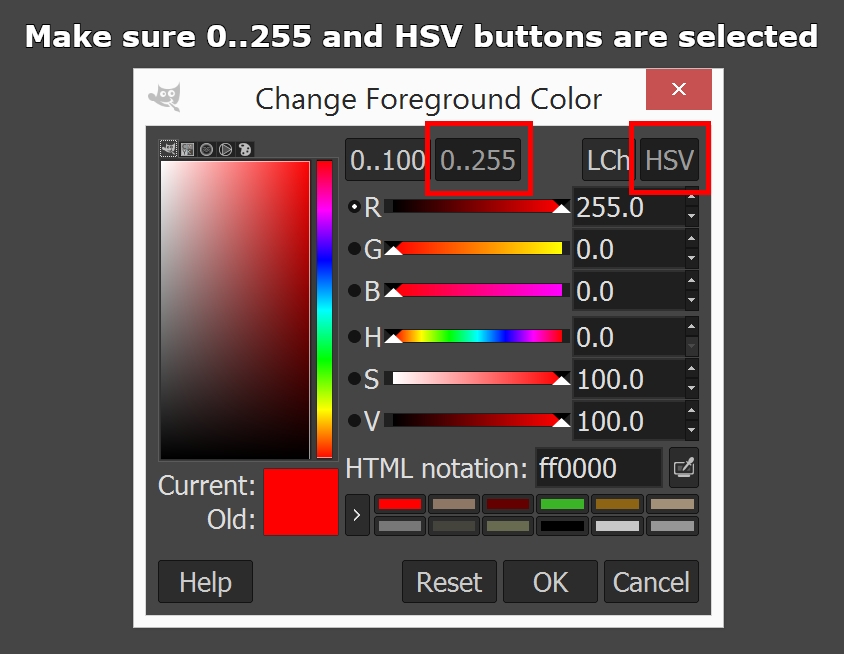
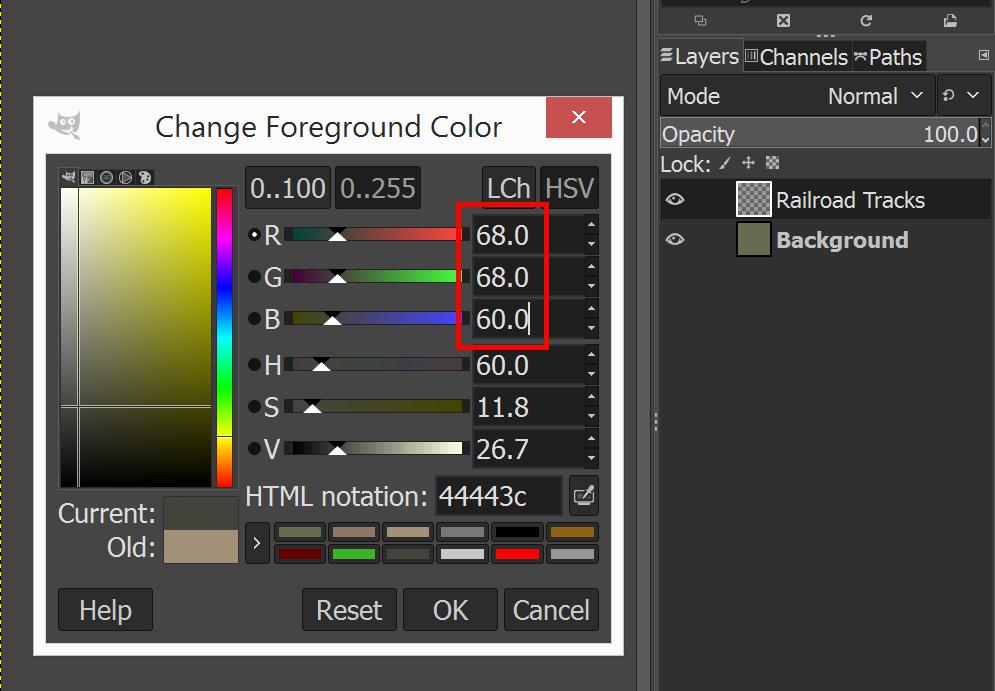
So in "Change Foreground Color" dialog make sure "0..255" and "HSV" is selected by clicking on them.
For railroad tracks we use RGB 68,68,60 color. In change foreground color dialog type in R 68, G 68 and B 60, as shown below.
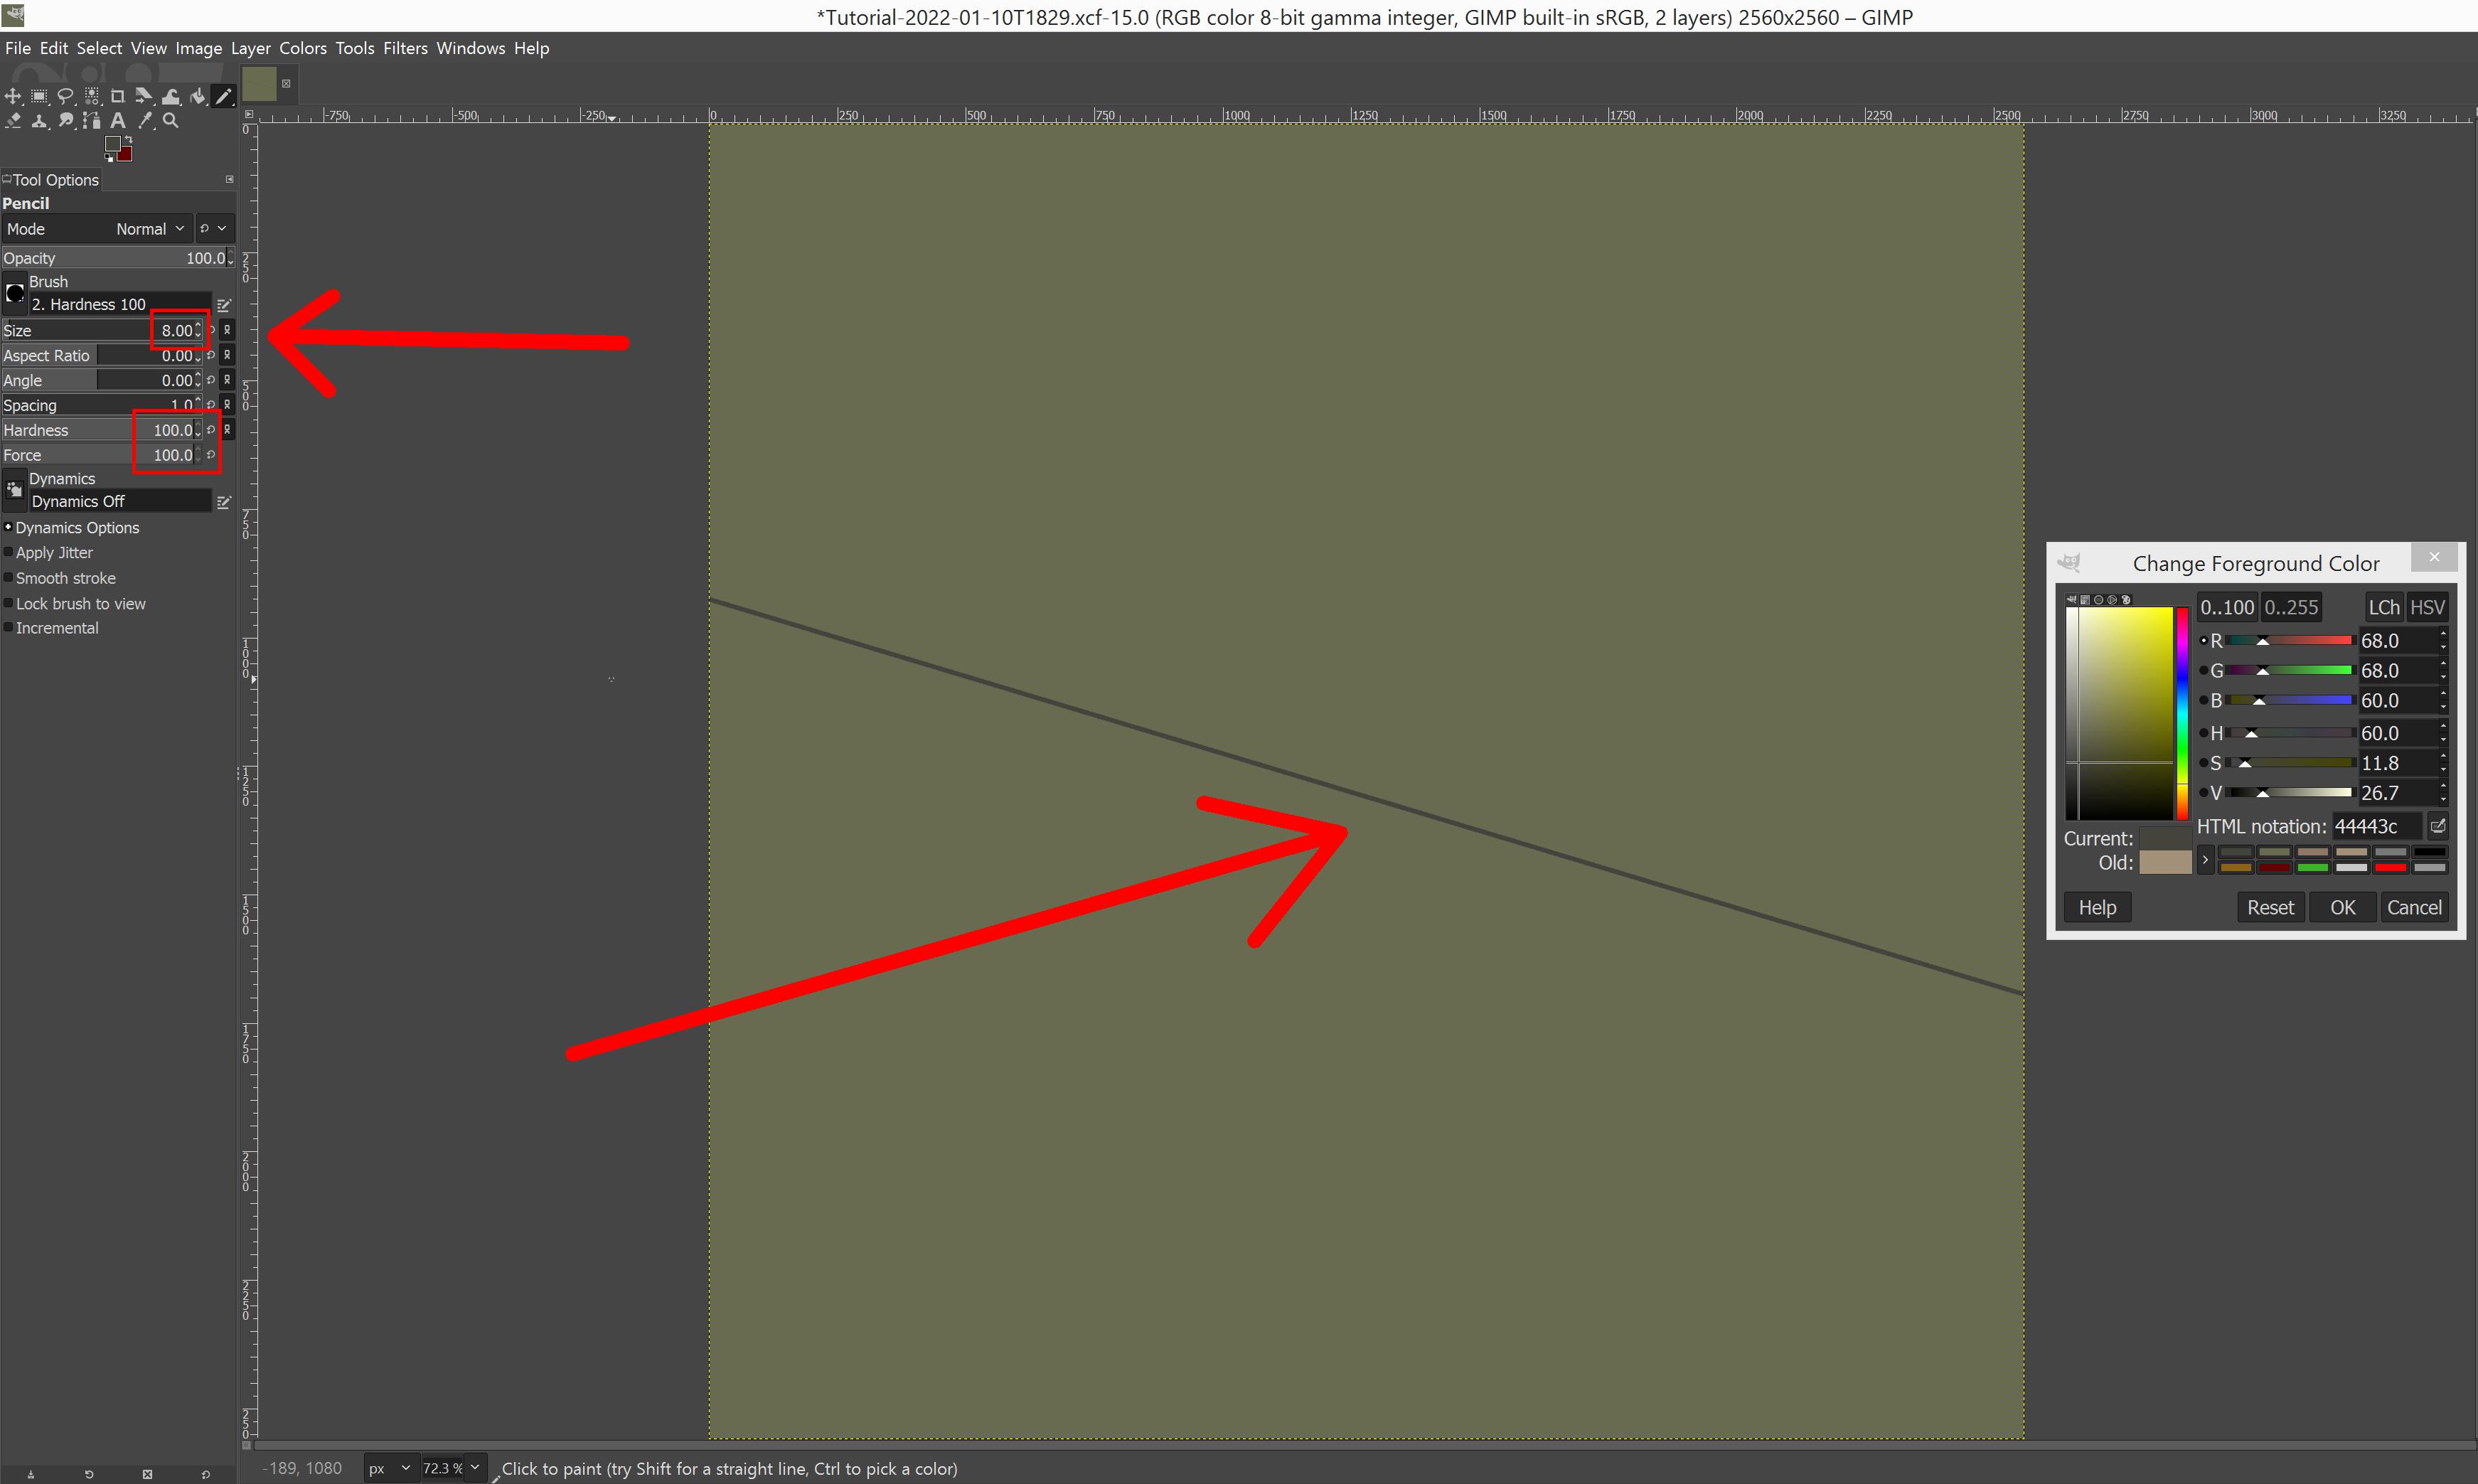
Then select to pencil tool mode (press N key), use size 8 pixels, hardness and force 100, then draw a line across the image, it doesn't matter where you draw it just somewhere you think a railroad should go. You can draw this free hand or using line drawing mode with SHIFT-LMB click. It really doesnt matter, just paint it somewhere, free hand is fine for now.
Next we paint asphalt roads. By now you should know how to create "Roads Asphalt" new layer. Make sure the "Roads Asphalt" layer is selected.
Select RGB 120,120,120 color and then size 10 pixel pencil. Then start painting asphalt roads, free hand is fine again as you can see from below example.

Now we repeat basically identical procedure for dirt/gravel roads by using RGB 162,144,120 and pencil size 5 pixels. Drag the "Roads Dirt" layer below asphalt layer by middle mouse button drag.
I painted several dirt roads connecting to the asphalt roads, these are extremely inaccurate and screwy, just an example roads, check below.

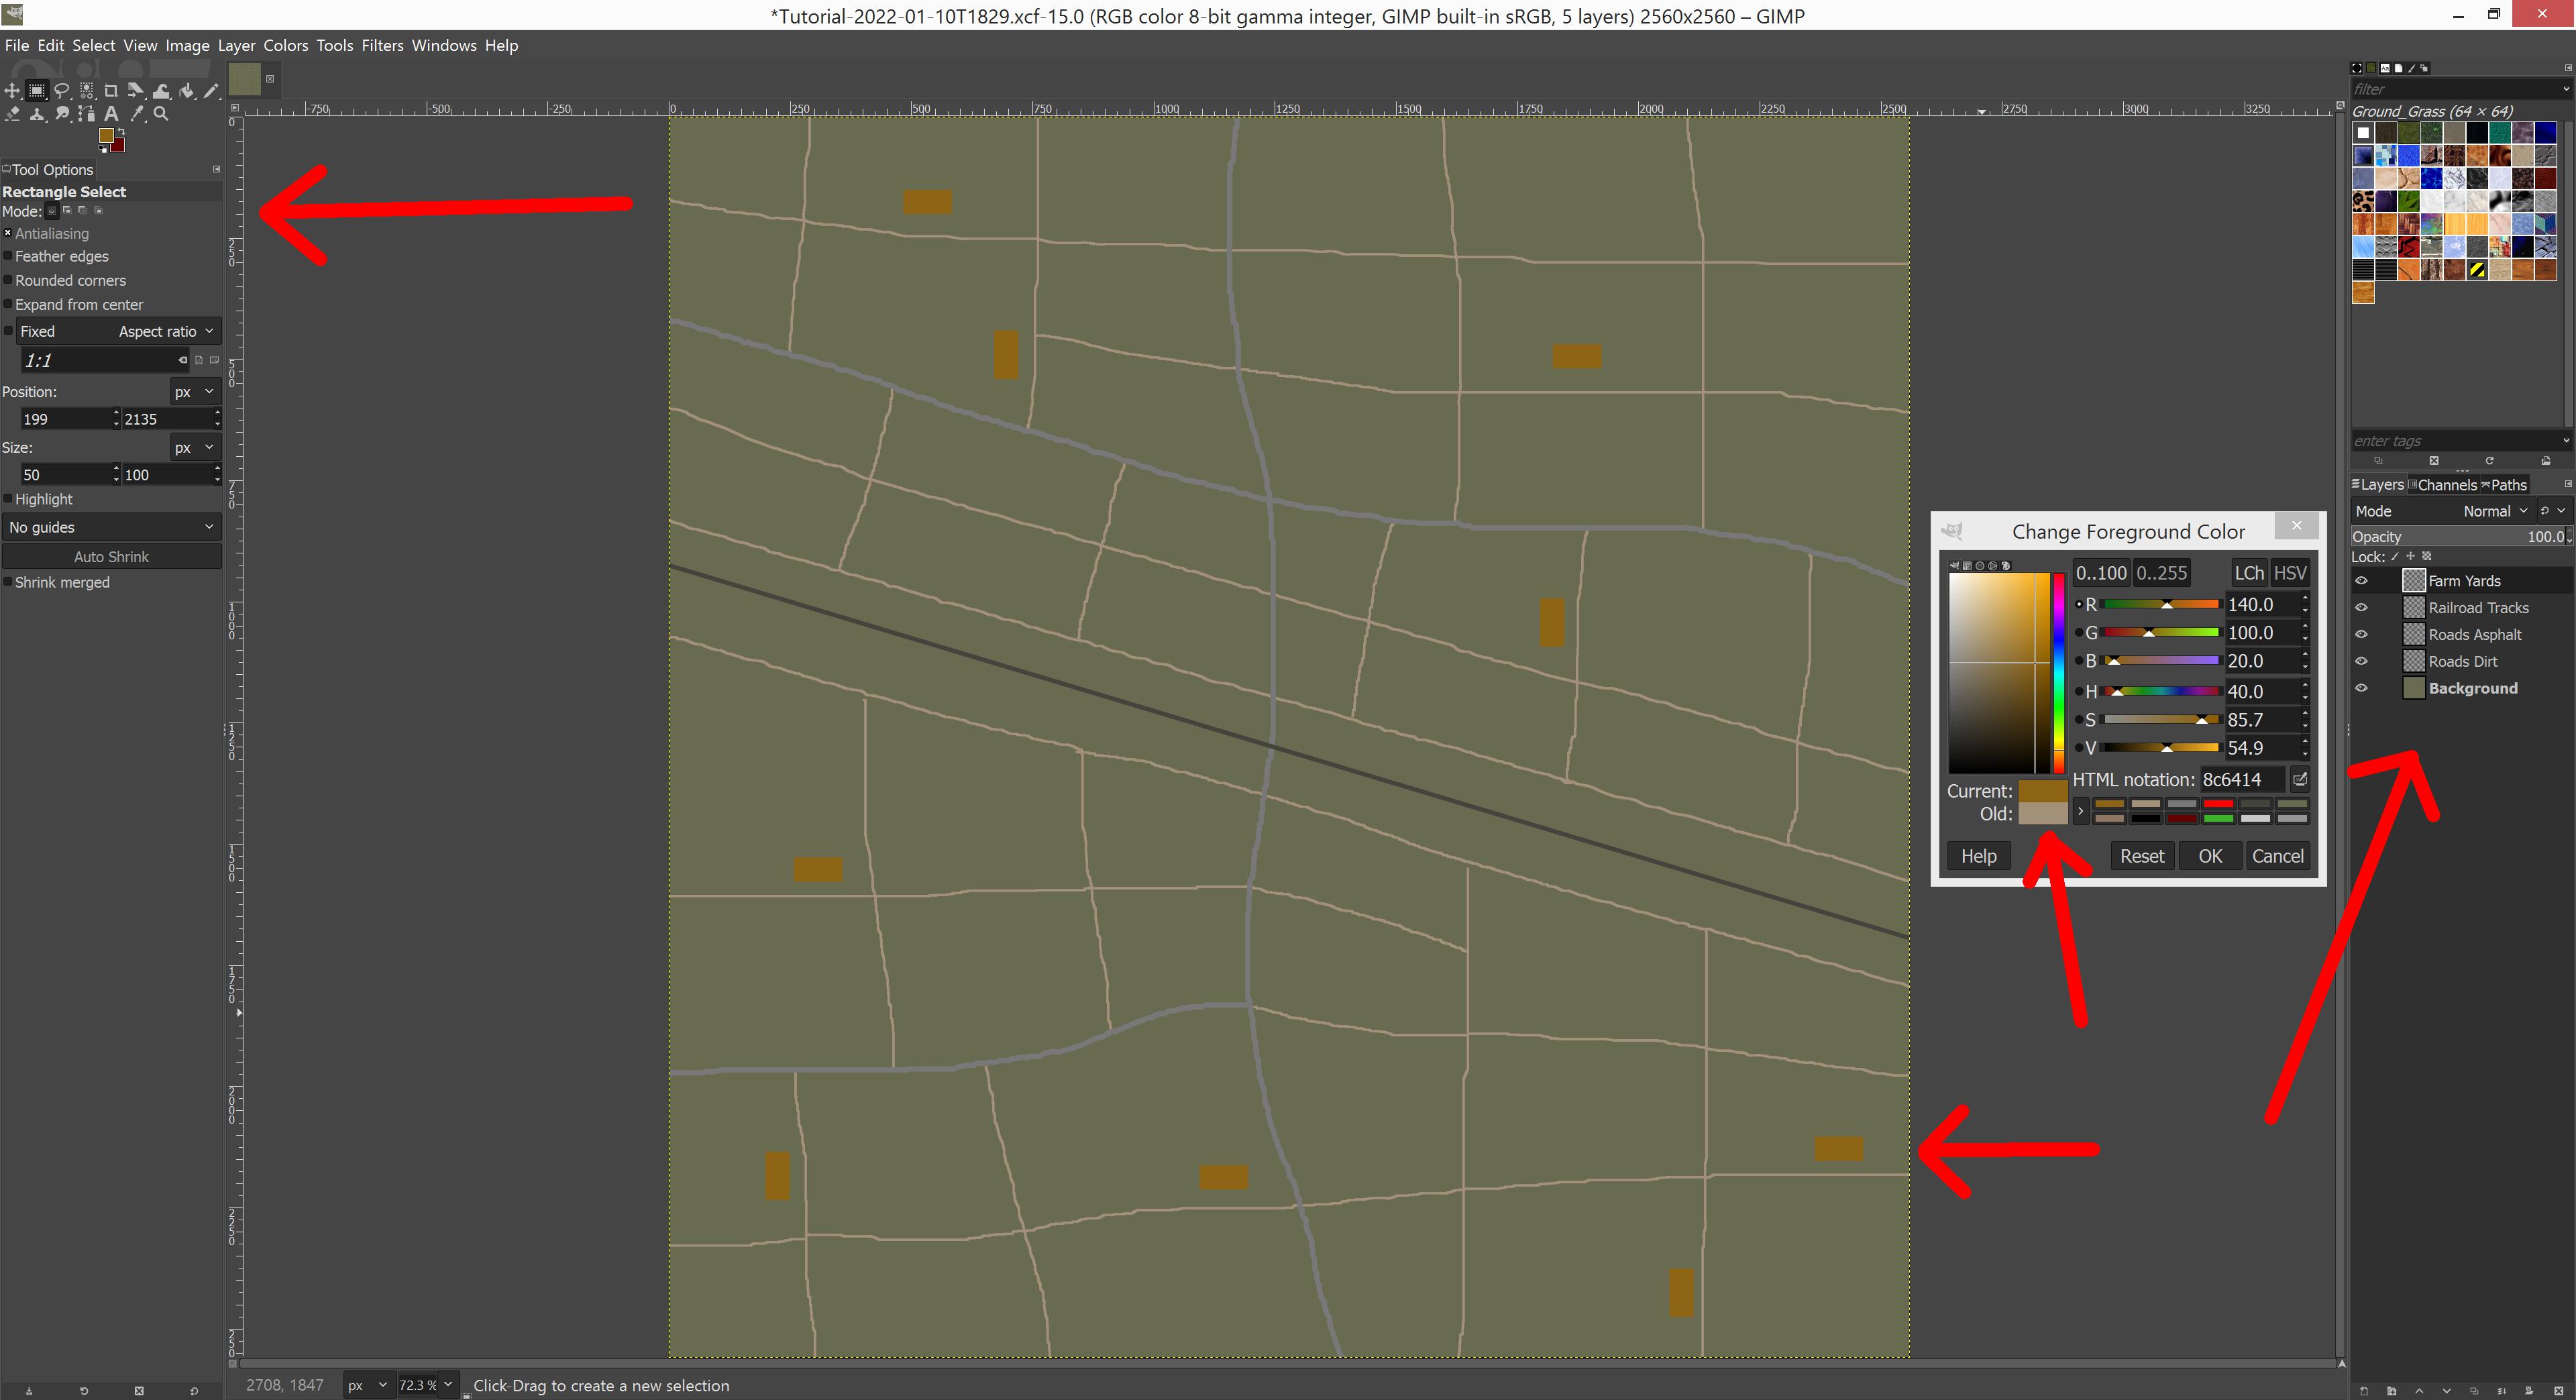
Next we draw some farm yard dirt / gravel areas, these will not be in roads dirt layer but in their own called "Farm Yards". So create farm yards layer and choose RGB 140,100,20 color.
Then choose rectangle select tool with R key. Make sure feather edges option is not selected as that creates "smear pixels" which are not allowed in design doc.
Next I'm just lazily dragging few boxes and paint them into "Farm Yards" layer using foreground fill tool CTRL-, (control and comma keys together). It really doesn't matter how or where you paint these colors, but don't overlap them with other colors, I chose to put farm yards somewhere nearby dirt roads.
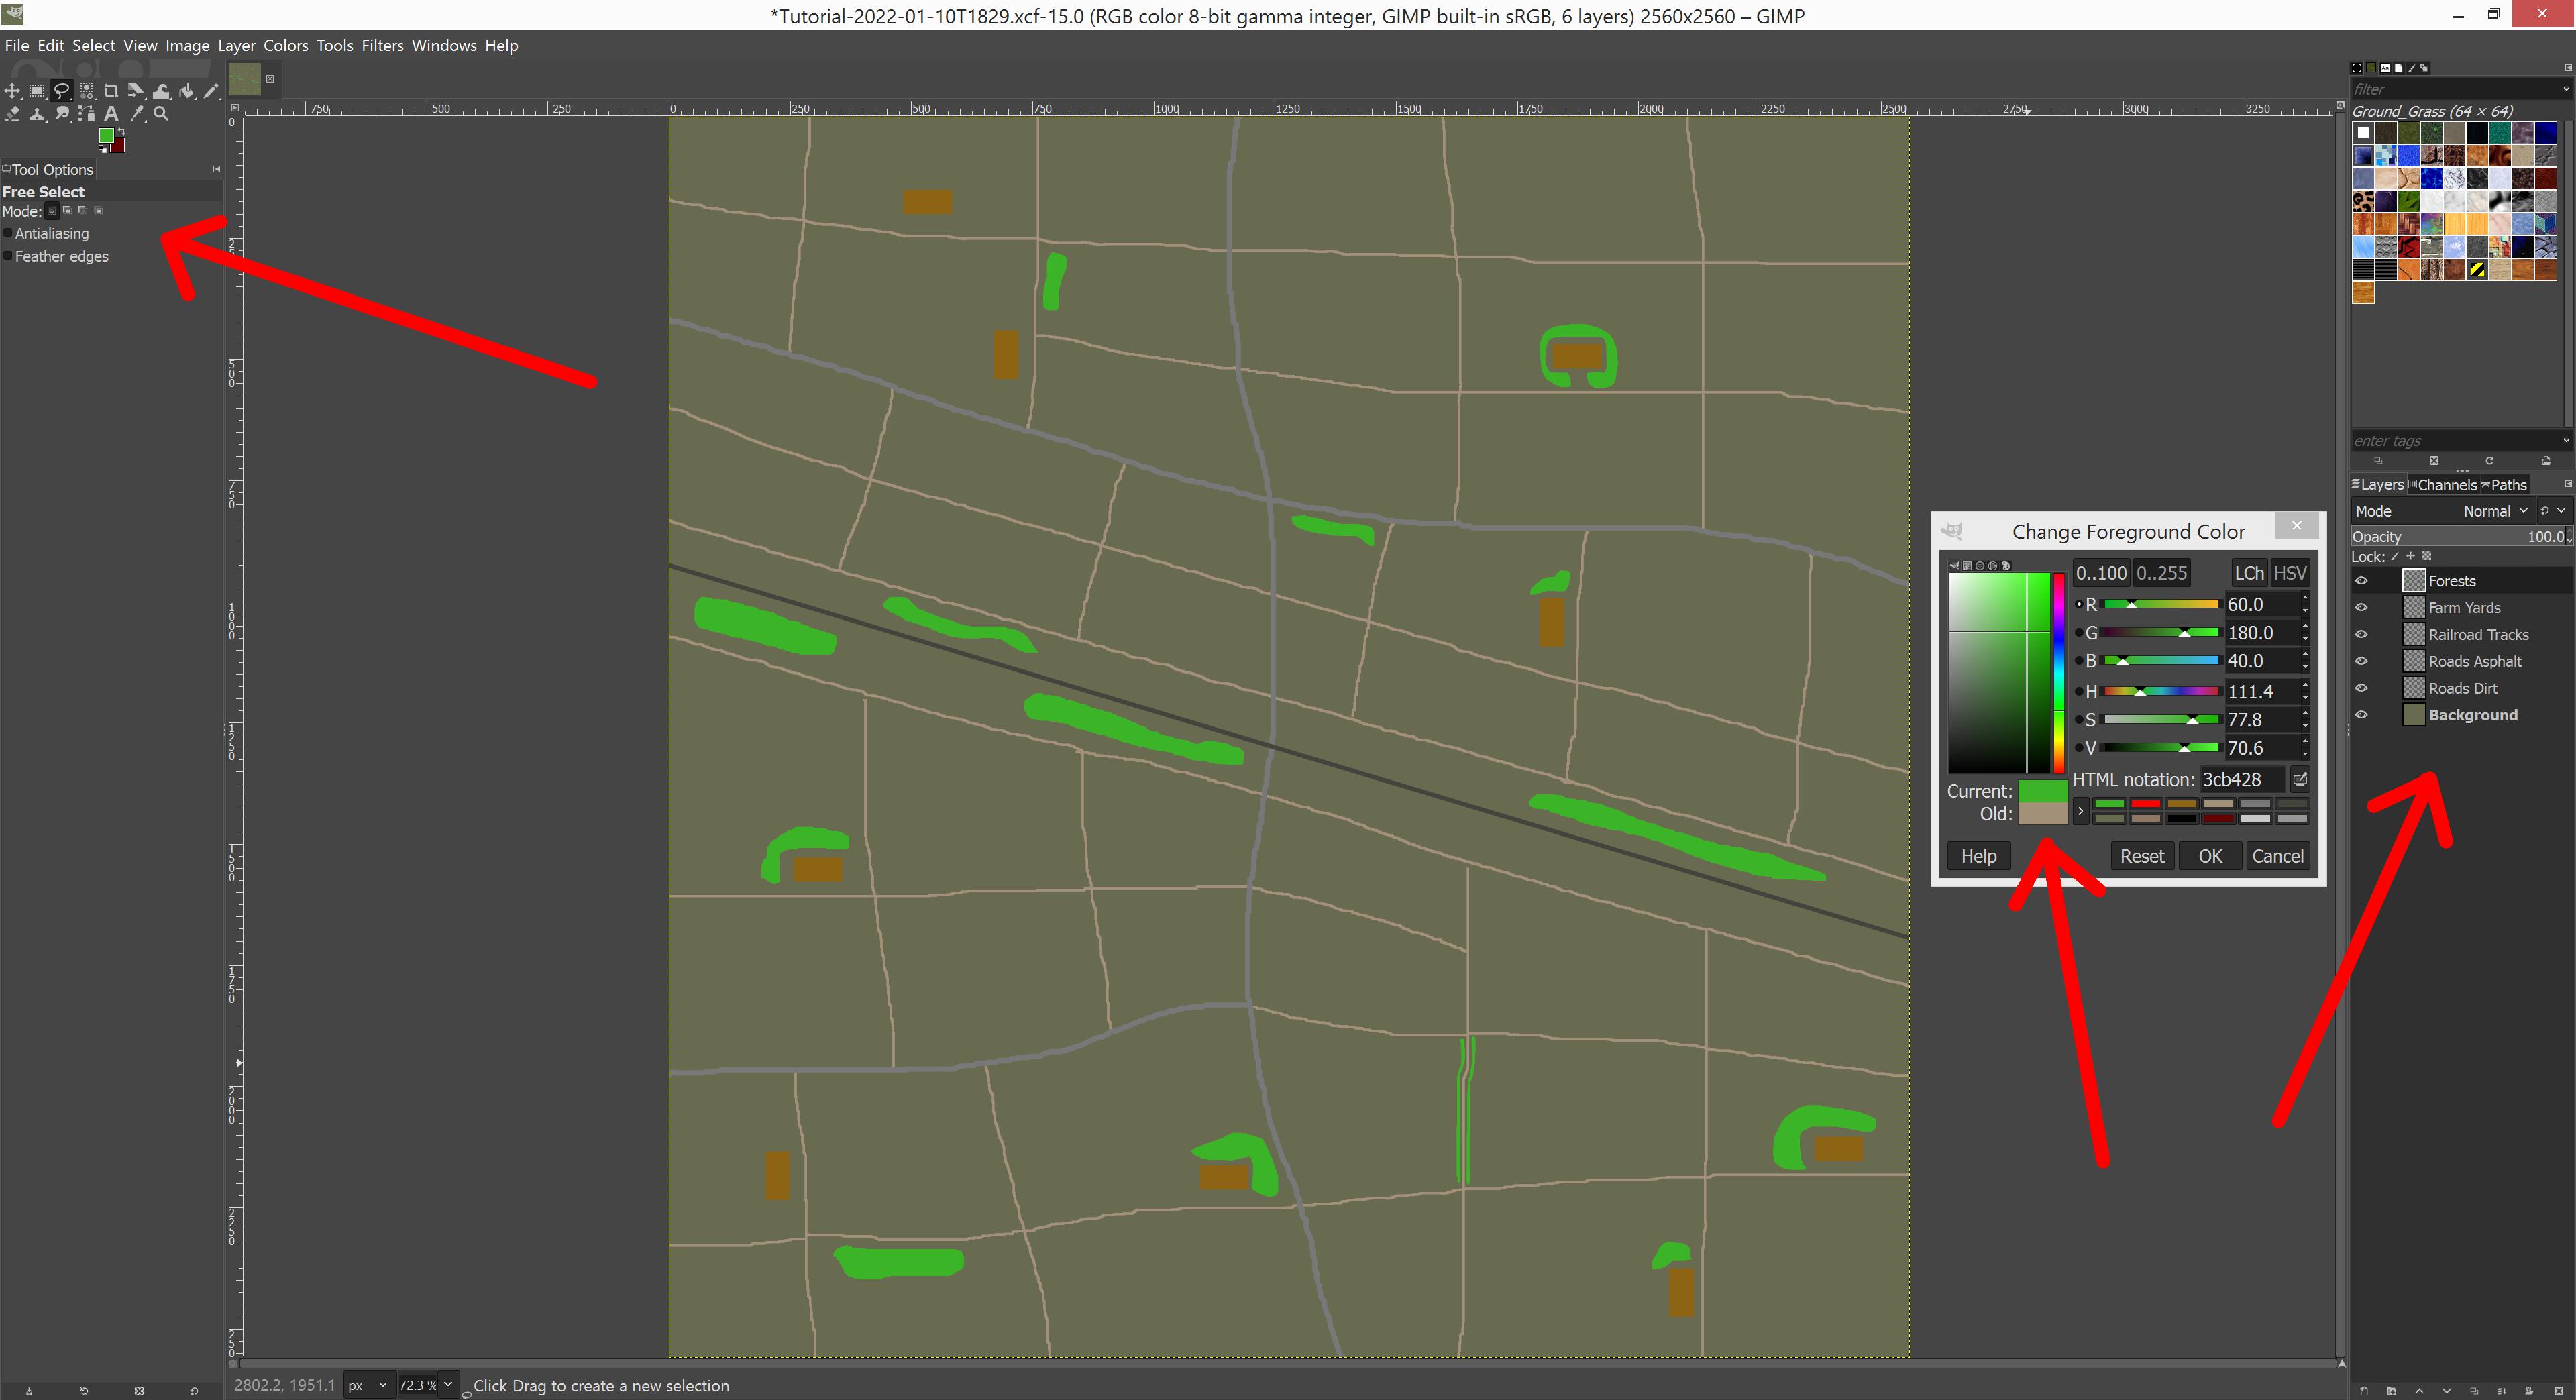
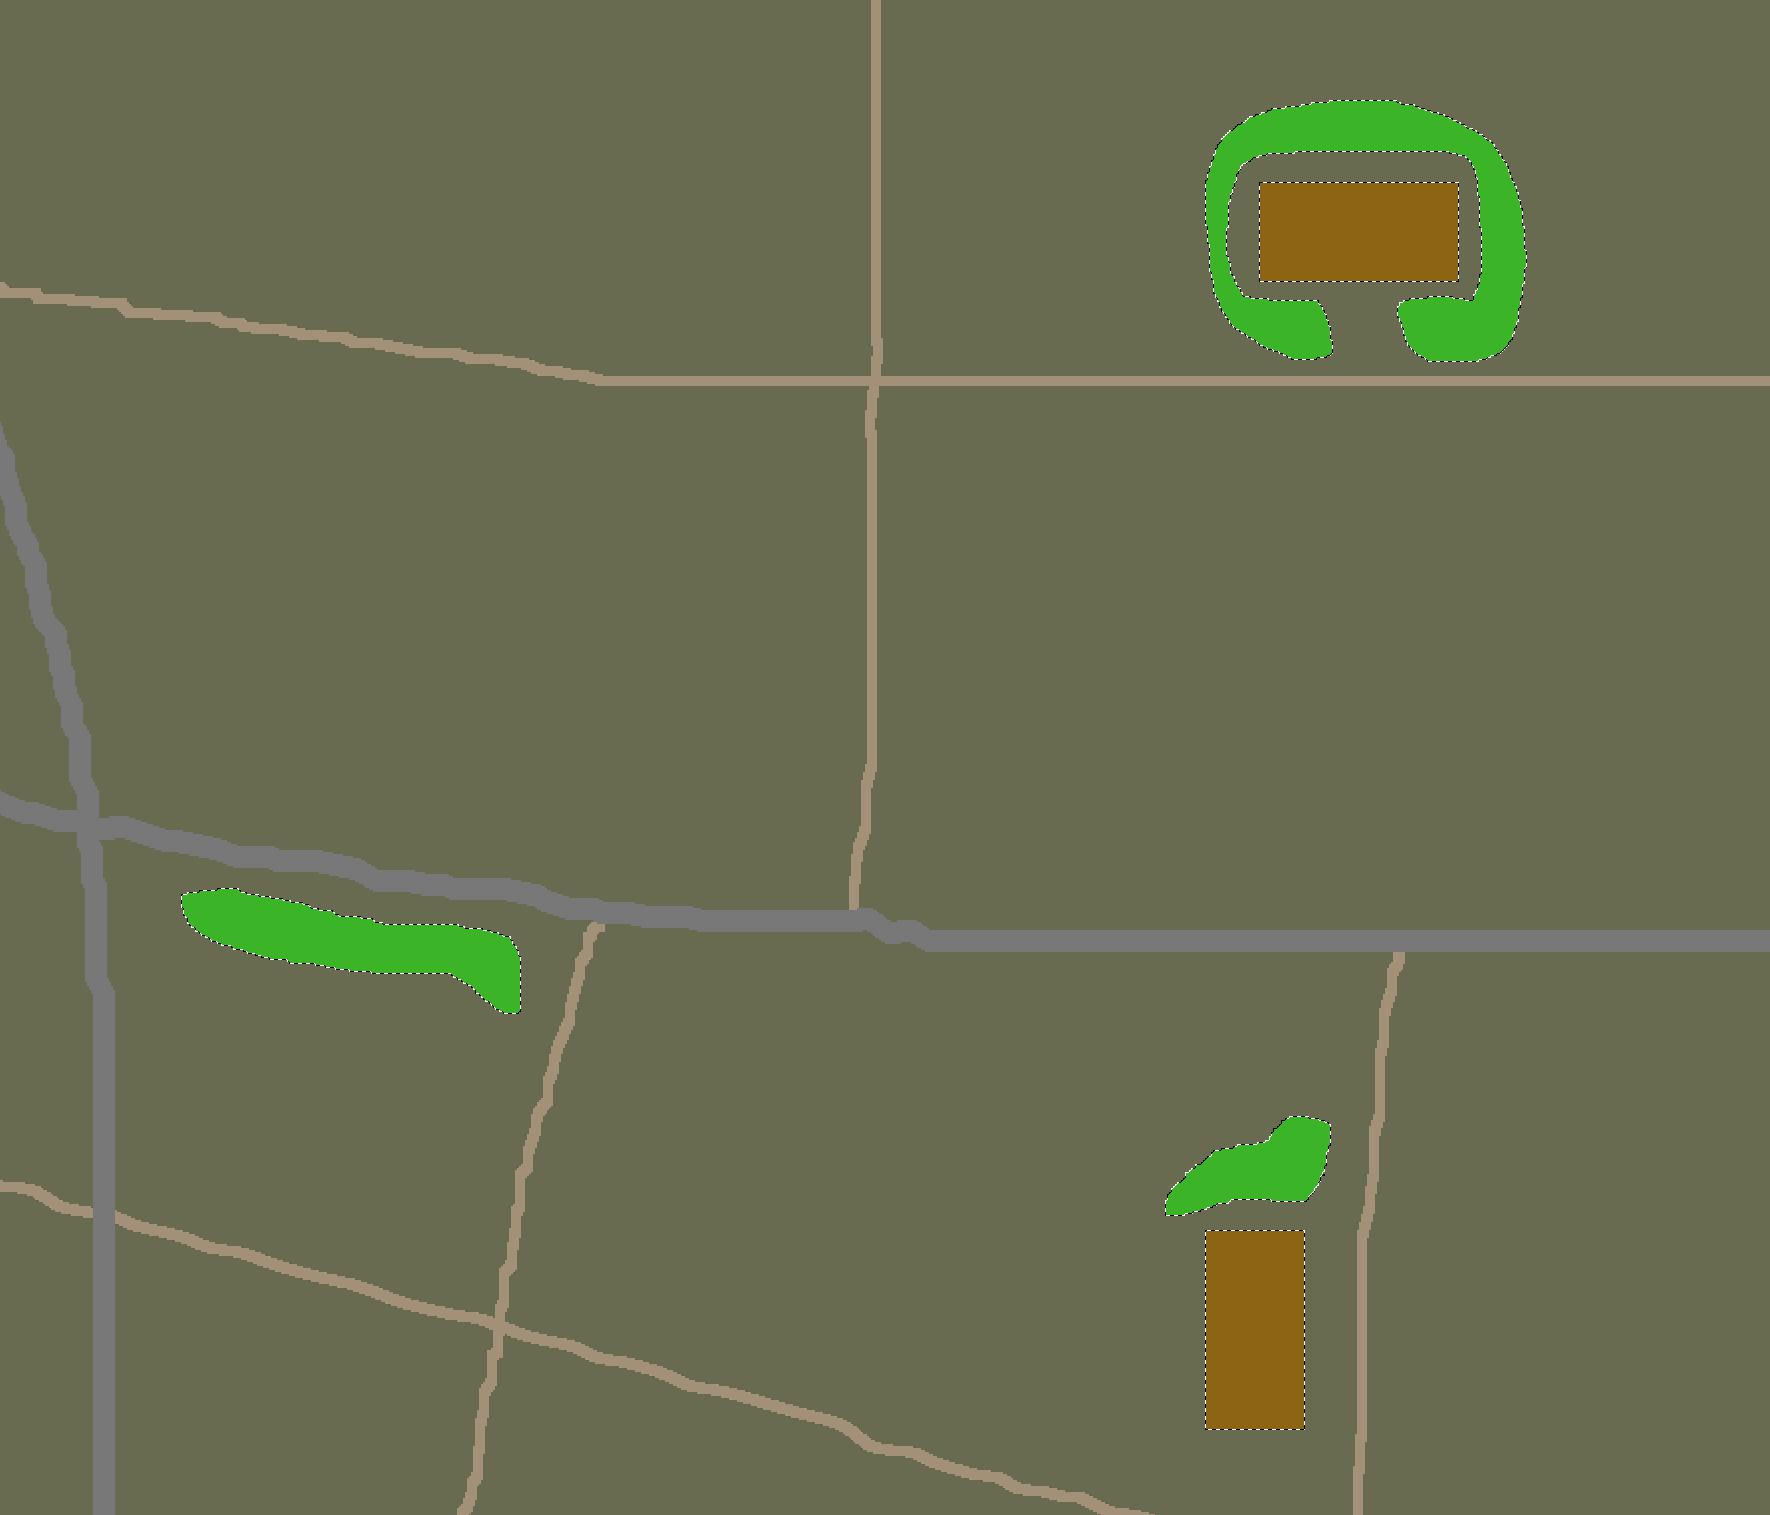
Then we do forests, for this I use RGB 60,180,40 and new layer called "Forests". For painting I use free hand selection tool, F key. Make sure antialiasing and feather edges are not selected because that creates those smear pixels.
Then just draw free hand forest blob areas where ever you want, for tutorial purposes it really doesn't matter, its up to you, just don't overlap other colors. Oh and make sure you are in "Forests" layer.
Then fields, create a new layer called "Fields" and choose RGB 255,0,0 which is red color.
Now we have few options how to draw our fields, it really depends what you want to achieve and how lazy you are (heh).
Quick mass automated way is to paint everything except our existing terrain features into fields, this works surprisingly well for those fictional american style terrains with big fields coming right up to roads and farm yards.
Free hand method is to simply use free hand selection tool with F key, draw selection for each field individually and then CTRL-, foreground fill the selection with red color. Or you could use rectangle selection tool and make those boring square fields.
The quick mass automated way is somewhat complex or tricky, in short you make selections using existing layers and colors, then invert it and paint everything red in fields layer.
Use SHIFT-O select by color, one by one select each of the layers and click the layers color. For example select forests layer and click the green forest color, all of the green pixels are now selected with "marching ants" animation. Its a bit difficult to see from a screenshot but lets try anyways.

Next comes the tricky part, select farm yards layer and make sure SHIFT-O select by color option is .. well selected. Then click one of the farm yards with SHIFT-LMB which is "add to selection", if you click simply with LMB then its "create new selection" instead. Make sure you SHIFT-LMB click, now you should have forests and farm yards selected.
Then go through all the remaining layers except background, you sould end up ALL the terrain feature painting colors selected.

Please note that if you have several layers selected and the image resolution is very large, lets say higher than 10240 x 10240 resolution, GIMP becomes quite sluggish. Well at least it does in our i7 4790K + nvidia GTX 1060 3gb hardware computer. This is unfortunate, but expected behavior so be aware of that.
Now comes the next tricky part. We must enlarge / grow this selection by 30 pixels. Use menu select -> grow.

When the dialog comes up use 30 pixels. Then just hit enter or click OK and we get this nice selection done.

Next we invert the selection, use menu select -> invert or press CTRL-I.
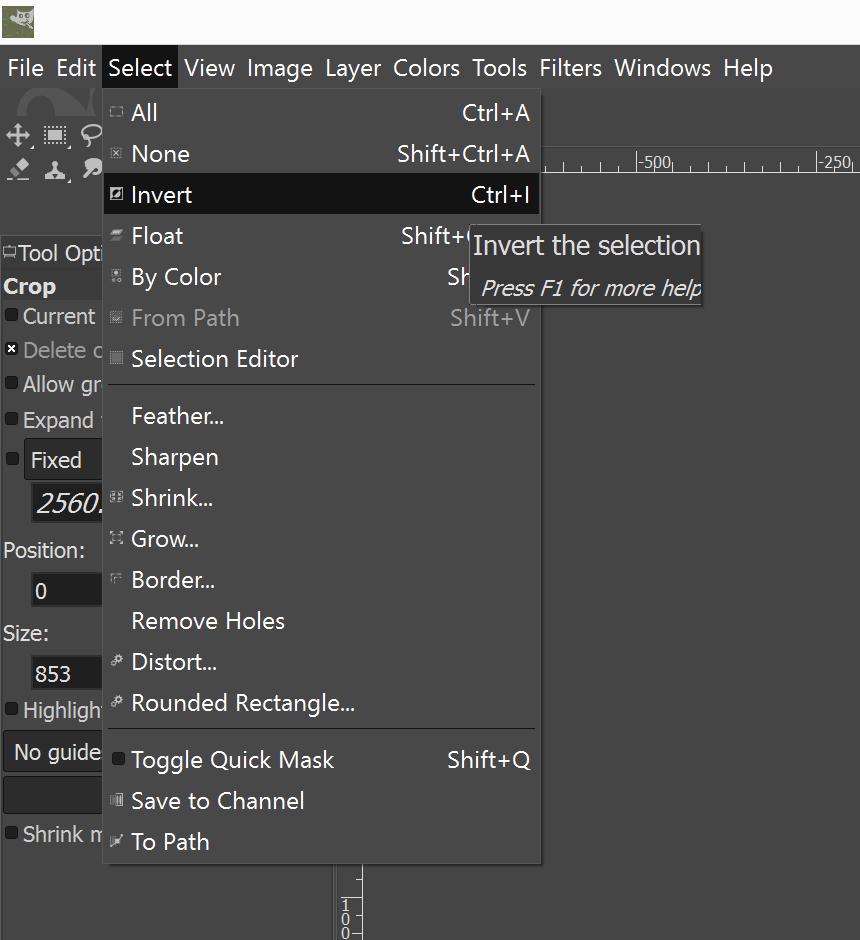
You can hardly see a difference in the selection but don't be alarmed. For this reason no screenshot example as it looks almost identical to the above selection image.
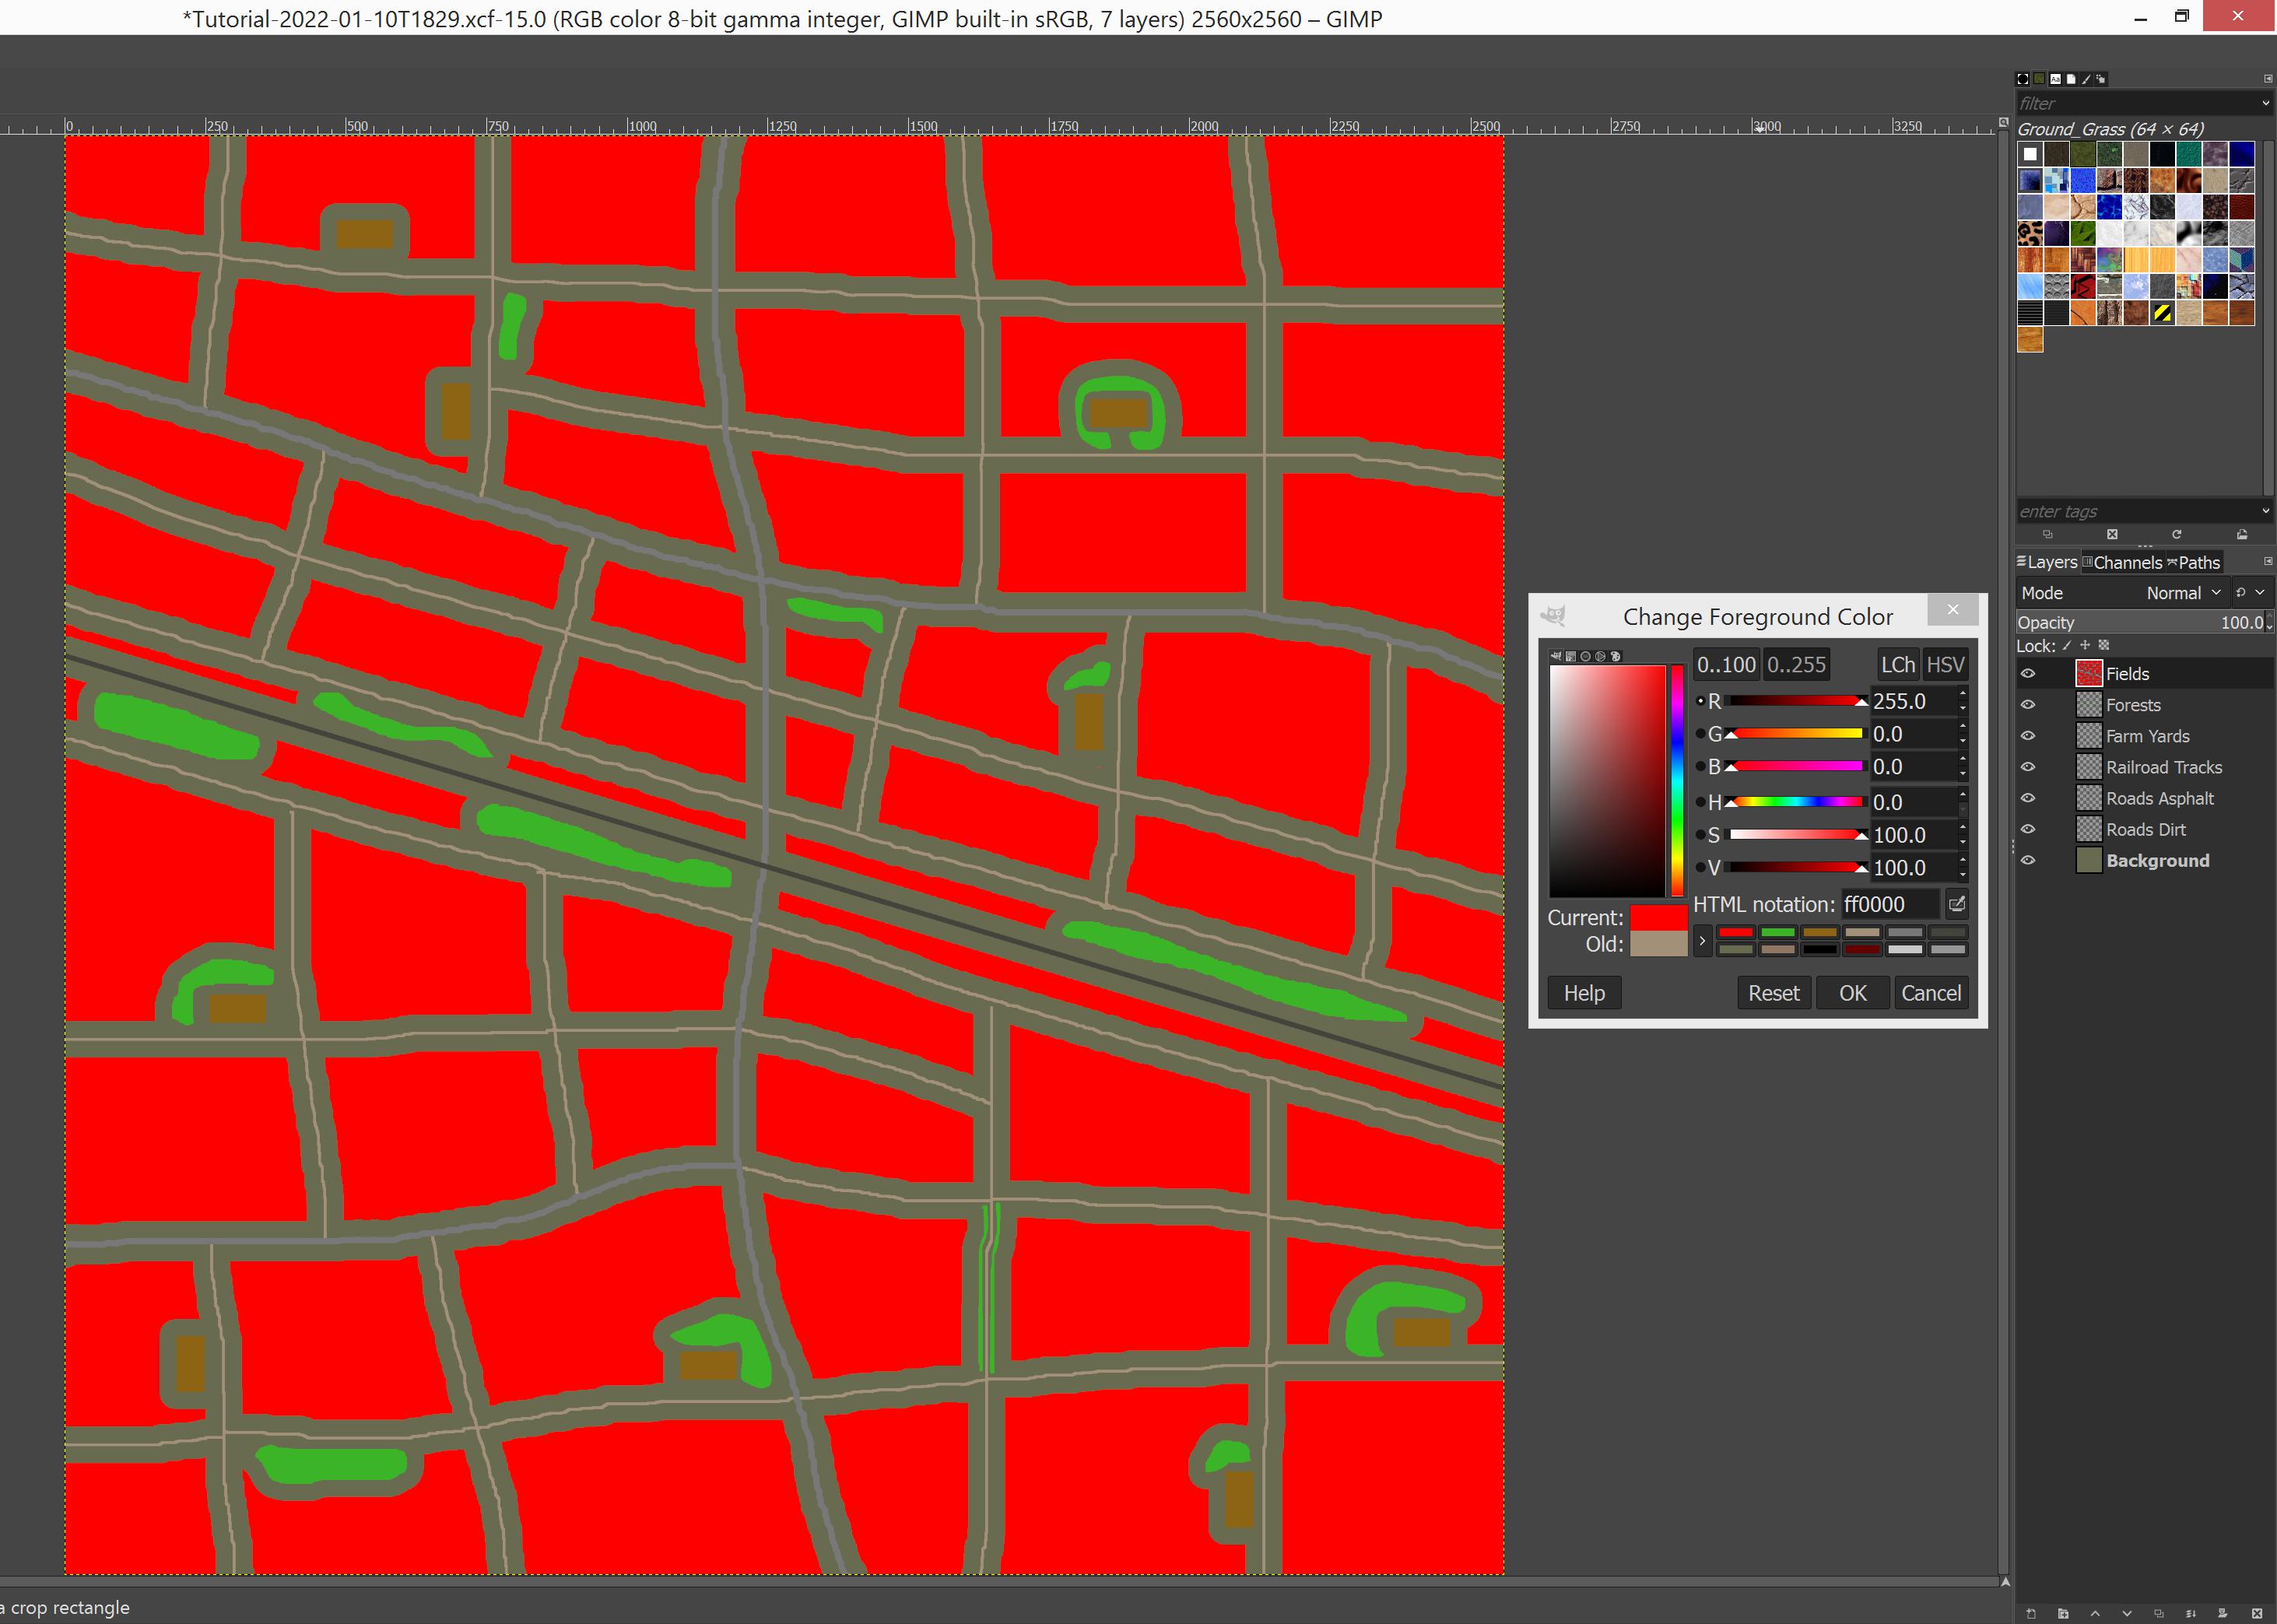
Then we are ready to paint, select "Fields" layer and RGB 255,0,0 color.

Then press CTRL-, foreground fill, now your fields appear as red.
Now would be a good time to CTRL-S save this image ![]()
This mass selection automated method unfortunately generates those sharp corners for the fields, on some cases it even causes "peak" narrow corners which are impossible to work with farm implements unless there are huge empty area around the corner, but in any case its highly unrealistic.
But mass selection is incredibly fast method to fill in hundreds of fields depending on terrain size and roads / features complexity.
Once fields were done I used rectangle tool to make a big selection almost all the way to terrain edges, inverted the selection and with delete key erased all the far terrain edge field painting, this way you don't have a problem with vehicles hitting the edge geometry.
To round off field corners I used select by color, clicked a field to select all red pixels, then shrink 5 pixels and grow 10 pixels, now all fields are a bit larger and corners are nice and round. This method requires you to have some extra empty space around the fields.
For fancy screenshot purpose I changed red fields color to FS19 standard fields RGB 142,119,101 so now besides farm yards and forest blobs it looks almost like felsbrunn / ravenport PDA map image, well at least color wise ![]()

That is all ![]()
GIMP Terrain Design Document tutorial was specific to GIMP painting design doc image, on other tutorial you'll learn how to use GraphicsMagick when processing GIMP exported images to Giants Editor readable _weight images.
Please continue reading Design Doc To Density And Weight Images Using GraphicsMagick tutorial page.
Terrain Edge Cut
Edge cut, or border "buffer" so to speak, so that your fields will end before reaching the far edge of the terrain.
Why is that important? Well imagine cultivating or seeding a field which reaches into the absolute end of the terrain, there you have either the oblivion beginning and you tractor can "fall off the map" or if you have properly done terrain with edge geometry blocks your tractor or more likely implement will collide into this geometry. You should have a nice amount of distance from any field edges into the actual terrain edge.
This example is for 10240 x 10240 resolution design doc XCF image.
In GIMP cutting that fields layer excess fat from the edge is done with rectangle selection, use position 10, 10 and size 10220, 10220 values and rectangle selection tool snaps into correct position and size, then just hit enter to "do it" and then CTRL-I to invert and finally DELete to cut off the excess fat.
Another option is to paint this selection with color of your choice to mark it as "off limits" from fields, or even from railroads / roads. Either way works, painted off limits area is permanent, the selection cutting you must do every time after changing field design by using mass selection edits.
Field Shape Bad Design Choices
Special note: this info was taken from dev diary PMC Undefined Farms 20km page.
This farm yard has position too close to the field corner which created this kind of narrow field location, its otherwise a big field but now this long narrow spot causes issues with courseplay multiple tools operations, try to imagine harvesting that field with four combines or cultivating it with two wide implements, there will be bad overlap.
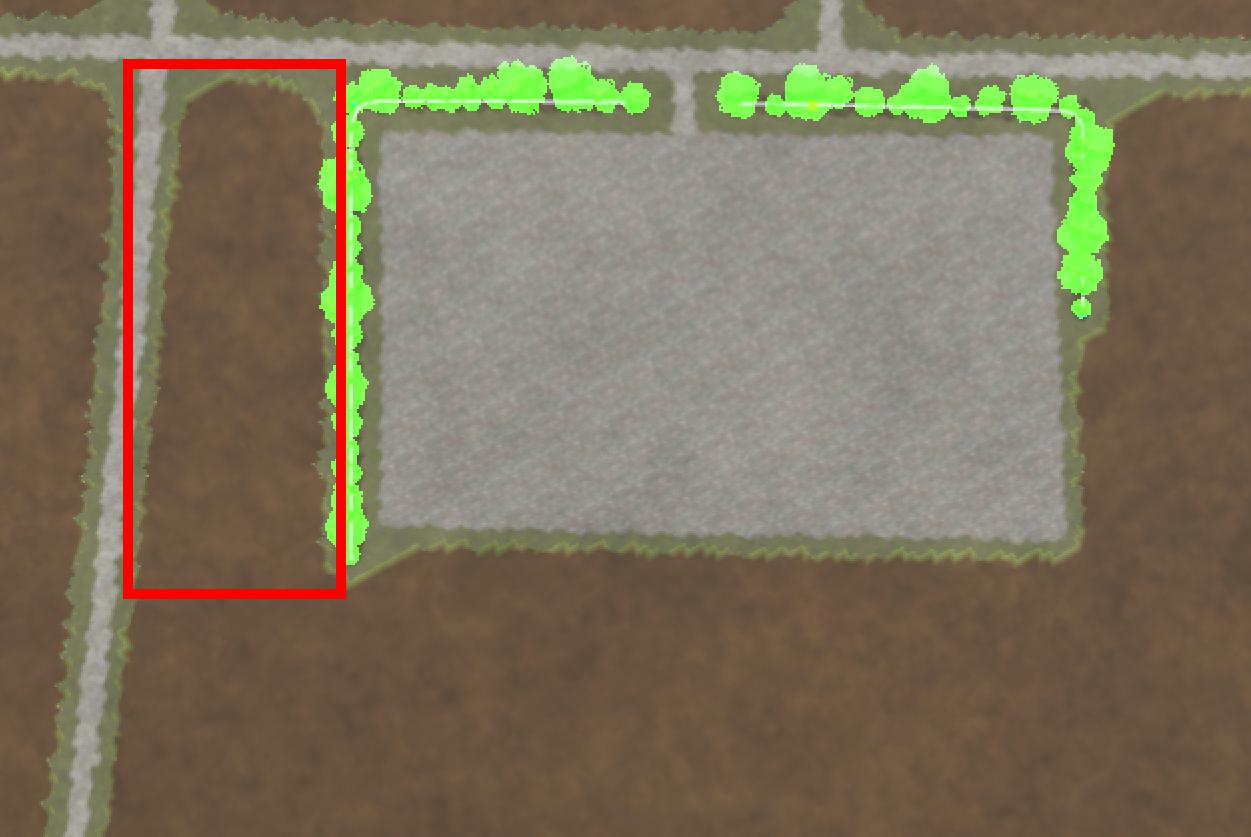
This design level issue should have been solved by having better overall "vision" not to place the farm yard so close to the west side road. This could have been achieved in various ways, either creating this location more center of the field in general, or simply making the farm yard less wide and more "tall" instead. Just overall you have to be careful not go create those narrow spots on otherwise a big field.
Don't get me wrong, there is nothing wrong in a big terrain to have small fields, but you have to decide if you are generating a large field or a small field, you just cant do a large field with such narrow spots, it just frustrates players/farmers and especially courseplay.